Many new photographer wonder how they can best adjust their camera settings. All the different dials and buttons on advanced cameras can cause confusion.
In this article I’ll introduce you to how you can adjust your camera settings for the best photos.
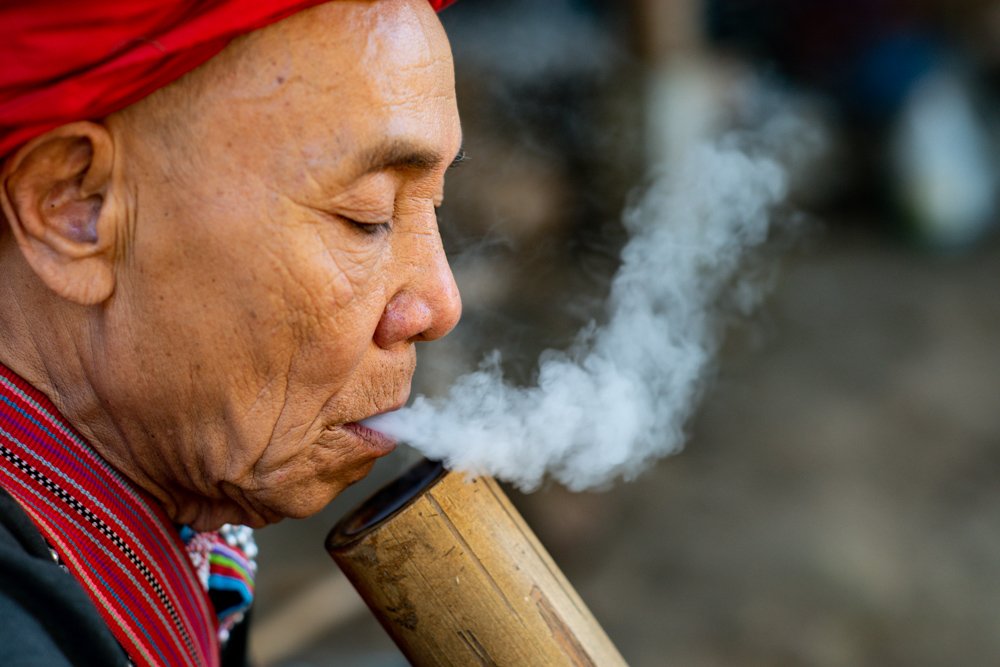
Manual mode can challenge people as to which camera settings to adjust for the best photos. I am often asked by people taking our workshops in Thailand, “Kevin, which setting should I change first?”
Sadly there is no one correct answer to this question. “It depends,” is the best first response I am able to give to photography students. And then follow it with three questions.
- “How much light is there?”
- “What are you taking photos of?”
- “What’s your intent for these photos?”
Once I know the answers I can then offer some recommendations. This advice will steer you towards making the best choices for exposure triangle and focus settings.
Light is the Essence of Photography
The word ‘photography’ means writing with light. When there is no light, you cannot make a photograph. It is the essential ingredient.
When there’s a lot of light, you have more options on how you set your camera to make a well-exposed photograph. When the light is low, so are your options.
If you tell me there the light is bright and abundant, I will tell you to set your ISO low. An ISO setting of between 100 and 400 should be sufficient. Low light situations require a higher ISO setting to allow your camera to manage the light better.
Even in low light our eyes do not see as well as in daylight. Cameras are less capable in many ways. Boosting the ISO to a higher setting will give you more flexibility with the other two settings of the exposure triangle.
I treat my ISO setting as the foundation of my exposures. I set it and leave it unless the light changes significantly.
Why It’s Important to Recognize The Subject of Your Photo
When I know what your subject is I will know if it is moving or static. From this information I will recommend altering either your aperture or your shutter speed next.
A moving subject requires you to use a faster shutter speed to ensure that it is sharp in your photos. If you don’t want it sharp you need to use a slower shutter speed. This ties in with the next question about the intent you have for your photo. So, you see, again, “It depends.”
Shutter speed considerations with static subjects are not so vital, so long as your camera is held steady at slow speeds. Aperture settings come more into play with subjects that don’t move.
Stationary things can be isolated more easily so aperture settings can be considered over shutter speed. Do you want to isolate your subject or include enough details within your composition? This will determine the aperture setting you choose.
Shutter speed and/or aperture setting will have a creative influence on your photos. Once you have decided which is of primary importance you need to set the other well to make a good exposure.
Your main subject should be exposed well. There is no right or wrong exposure, this is part of your creative choice. You may want your subject evenly exposed showing good detail. You may want to create a silhouette or you may want to make it appear brighter than it really is.
Once you have your exposure set, focus is the next step. Generally you will want your main subject in focus. If your subject has eyes, you will typically want at least one of them to be sharp.
Your Intent Determines How Your Photos Look
Managing your exposure settings using manual mode allows you to control how your images will look. The type of lighting will also have a strong influence. Leaving it up to the camera’s auto settings usually results in generic looking exposures.
Hard light produces strong contrast. If you set your exposure for the brightest part of your composition, the shadows become very dark. Setting your aperture, shutter speed and ISO so the darkest areas of your composition are well exposed will mean the light areas are very bright. These decisions will largely control the mood of your photos.
When the light is soft and diffused the tone range in your composition will be narrower. The difference between the darkest and lightest parts of your image will not be so great. Creating an exposure where there’s detail in the shadows and in the highlights will not be so challenging.
Using auto settings and exposure compensation you can also have some degree of control, but I find using manual mode I can be more precise.
Timing of when you press the shutter release is also determined by your intent. You can flatter a person or make them look very awkward depending on when you take your photo. Photographing any moving subject it’s important to choose carefully when you will take your photo.
Anticipating the best moment to take a photo of a static subject can be affected by light, especially when you are relying on light from the sun. Early morning, midday or evening have different lighting. Taking a photo of the same subject in the same location, for example, a tree, it will look different at various times of the day or at night.
Three Examples of How I Adjusted Manual Camera Settings
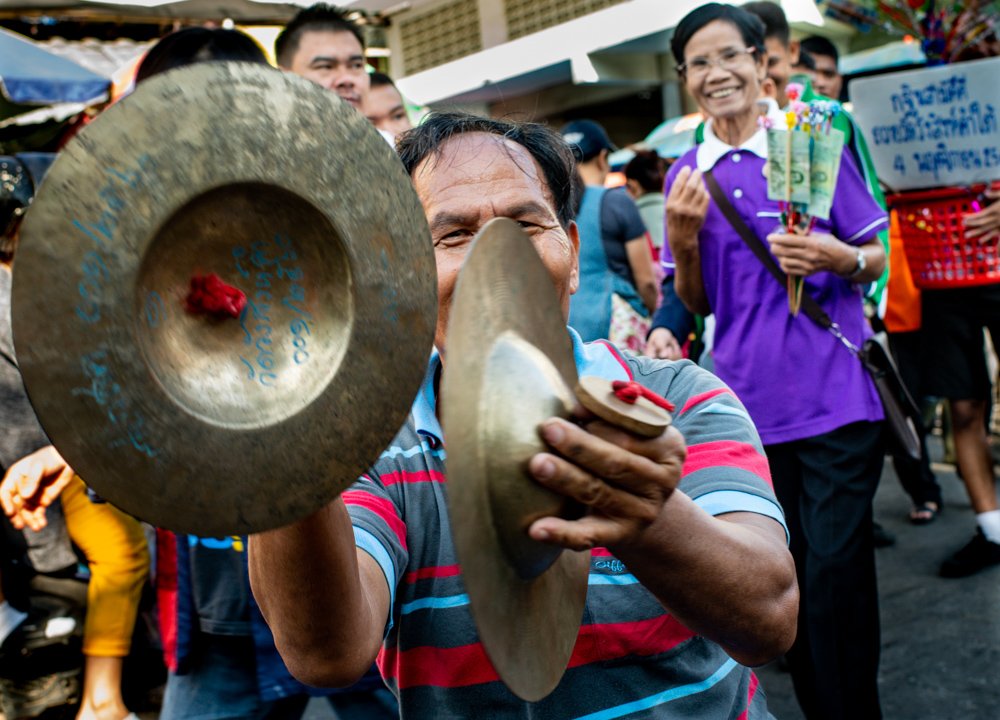
This man playing the cymbals was part of a procession that came through the market. He was moving constantly, (and making a lot of noise.) I wanted to make sure he was sharp so first chose a fast shutter speed. The background was very busy so I wanted a reasonably shallow depth of field. I needed to be close to him as my aperture was set to f/5.6 to balance the light with my shutter speed of 1/200th of a second.
Timing and focus were the most challenging aspect of this photo because the guy was moving constantly. Taking lots of photos was essential to ensure I had one that is sharp.
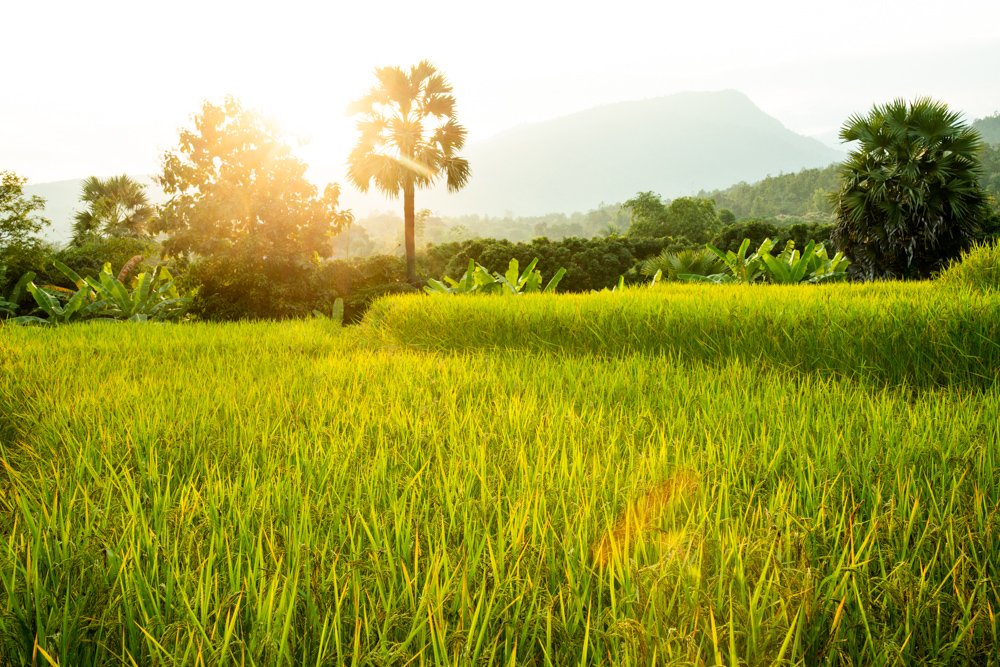
For the view from our home I chose a narrow aperture so I could get the rice in focus. Then I set my shutter speed to achieve the exposure I wanted.
I took the photo close to sunset. Having the sun in my frame means the contrast between the brightest and darkest areas in my composition is vast. I wanted to set my exposure so the rice looked best and there was detail in the shadows.
Timing for this photo was not challenging as the only element of my composition moving was the sun.

My photo of the young monk working on his metal art project involve a subject which is both static and moving. He was sitting still and I wanted to isolate him as the background was distracting. His hammer was moving frequently and fast. I wanted to freeze this action and have the hammer clearly defined against the background.
I chose an aperture of f/1.6 and a shutter speed of 1/200th of a second. This blurred the background and froze the hammer movement. I was quite close to him so that helped achieve a shallow depth of field.
Again, I took lots of photos to ensure I had one with the hammer stopped in the right place. My point of focus is on his right eye. This lines up reasonably well with his hammer, punch and hand.
Choosing the Order of Your Settings for Manual Photography
It depends. It also takes practice.
What I often tell people who take out photography workshops in Chiang Mai, Thailand, is you must be committed. If you want to take creative control you must use manual mode consistently, as much as you can.

Before you are used to it you may find it frustrating. It is less complicated to use an auto mode, but easy isn’t all that good most of the time. Your photos will look more generic when your camera has control of the exposure settings.
Commit to using manual mode as much as possible and before long it will become second nature. At first you have to think things through step by step. As you become more proficient the order in which you make your decisions will be more fluid. They will become second nature.
Don’t be shy of switching back to your favorite auto mode if you’re concerned about missing a photo. Capture your image. Then, if you have time, set your camera back to manual mode and adjust the settings yourself. Be in control of your exposure and set it for your intent, the way you want to make your pictures feel.
Choosing to take a series of photos of the same subject over a period of time will help you learn. Having self-assigned photography projects is a great way to learn. If you want to accelerate your learning finding a photographer mentor will boost your learning experience. A good mentor will set you assignments and projects and guide you through them.
Take notes about what you are doing while you’re taking photos. Analyze your pictures when you are back at your computer and consult the notes you have made. This will help you find your weaknesses and develop your strengths. It will, over time, help you to become more proficient at being able to quickly adjust your camera settings for the best photos.