

Understanding how to use your camera’s exposure meter is not as difficult as you may think. In this article I will show you how using your exposure meter well can help you improve your photography.
Throughout this series of articles, I’ve encouraged you to use manual mode and sought to explain the benefits of doing so. It’s essential to understand your camera’s exposure meter to master taking photos in manual mode.
Hopefully while reading my previous discourse, lights went on and you had a revelation. Manual mode does not have to be as complicated as you thought.
Using your monitor as a guide to set your exposure takes away the mystery. It shows you the magic. All you need to do is manipulate the exposure triangle settings;
If you can’t use your monitor or want to avoid the three downsides of monitor use, you’ll need to understand your camera’s exposure meter.

What is An Exposure Meter?
The exposure meter is technology built into every modern camera. It translates light values into digital information. This guides you to set your camera’s exposure correctly.
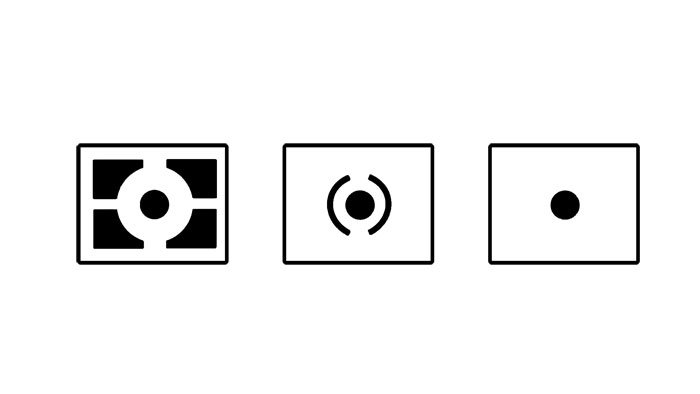
Looking through your viewfinder you can see this information displayed. It typically looks like this.
When the exposure is set correctly, according to the meter, the indicator will be at 0. If you cannot see the indicator lightly press the shutter release button to turn it on.
After a short period the meter will turn off and you will not see the indicator. Many Canon cameras this period is very short so you need to keep turning it back on.

How Do You Set The Exposure So The Meter Reads 0?
When you put your camera to your eye and see the meter indicator is off the left or right, the exposure needs adjusting.
You will see a – symbol at one end of the meter readout and a + at the other end. These let you know when not enough light or too much light will reach the camera’s sensor as you take a photo.
Seeing the indicator towards the – symbol you will need to choose a wider aperture, (lower f-stop number,) or slower shutter speed, (lower number.)
When the indicator is more towards the + this means at these settings the photo will be overexposed. You need to adjust the aperture to make it smaller, by choosing a higher f-stop number. Alternatively, you can choose a faster shutter speed, a higher number.
Changing the ISO setting will also affect your exposure. I prefer not to change it unless the light changes dramatically. When your aperture is at its widest setting and the shutter speed it the slowest practical, you will need to set your ISO to a higher number.

Here’s another article I’ve written about ISO if you’d like to dig into this topic a little deeper.
What Are The Different Metering Modes?
There are three main modes. Some cameras also include more advanced modes.
You need to check your camera manual or Google if you are not sure of how to switch between exposure metering modes.
Averaged Metering Mode
Each camera manufacturer uses a different term for this mode. Nikon calls it Matrix metering. Canon calls it Evaluative metering. Sony uses the term Multi metering.
In this setting, the meter will read from multiple areas across the entire frame. The camera will average the various light values and base it’s recommended readout on the result.
Spot Metering Mode
When this mode is chosen the camera will read light from a very small portion of the frame. This allows you to be quite specific.
Some cameras allow you to move the location within the frame of where the spot meter reads from. In other cameras, the spot meter is fixed in the center of the frame. You will need to consult your camera manual or ask Google to be sure.
Center-Weighted Mode
This is the original mode of metering that came built into cameras. It takes the reading from about 60% concentrated in the middle of the frame.
I rarely use this mode now as it’s really only helpful if you compose with the subject in the center of the frame.
How Can You Use Your Exposure Meter Most Effectively?
Most of the time my meter is on the averaging mode. This is default on most cameras.
I also use the spot meter frequently. So much so that I have programmed one of my camera’s function buttons to activate it. This makes it quick and easy to switch between averaging and spot modes.
Using these two modes is the most effective way I know to find what my exposure needs to be.

When Should You Switch Metering Modes?
Contrast is key.
In low contrast situations, your averaged reading will indicate a good exposure. This is when your composition comprises of fairly neutral tones and you’re photographing it in soft, even lighting.
High contrast, when the light is hard, shadows are dark and the tone range in your composition is broad, requires more work to get a good exposure. This is when taking a spot meter reading is most important.
Choosing which part of a high contrast scene to expose correctly is one of your main decisions as a photographer.
As I mentioned in this article our cameras see differently than our eyes do. Our eyes can see more tone in a high contrast scene than our cameras can. The way you control your exposure dictates the outcome of your photo.
Taking a spot meter reading off a dark part of a high contrast scene will mean detail in the highlights will be lost. These bright areas will end up being overexposed.
Reading the light from the brightest portion of a high contrast scene will mean there’s no detail recorded in the darkest areas.
An exposure reading from a mid-tone may cause detail in both highlights and shadows to be lost. This does depend on the tone range being photographed.
Where Should You Take a Spot Meter Reading From?
Read the light and adjust your exposure settings for the most important part of your composition. This is up to your creative choice.
Often the main element of your composition is obvious. In a portrait, it will be your subject’s face. For a sunrise or sunset, it will be the sky. In the photo below it was the orange marigold flowers.

Is There a Catch in All This?
No, but there is one other vital piece of information you need to know and understand. Without it, you will be less than satisfied with your exposures.
Exposure meters are calibrated to see every tone as middle, or 18%, gray. This is halfway between black and white.
Practically, this means if your entire frame it black, or white, or any other tone, your exposure meter ‘thinks’ it is middle gray. It will indicate the correct exposure to render any tone as being in the middle.
Our eyes respond dynamically to reflected light in real time. They are always adjusting and are not fixed on one exposure across an entire scene. Our cameras are.
Middle gray seems quite abstract and needs more clarification. I’ll explain more about it and managing the data your exposure meter provides in my next article in this series.

Is It Really That Complicated?
No. Not once you have grasped the concept of how you meter functions and the information it provides you.
I want you to succeed in mastering manual exposure.
Practice!
Every day.
Reading these articles, thinking about them and not getting out and working it through with your camera in hand will result in failure.
Now that you have this much information, making even one or two photos each day for a month with assisting you in becoming competent using manual mode.
Have you enjoyed this article? Maybe you’d be interested in readin my book? Photographing People – A Guide For Shy Photographers is a personal teaching about how to become confident to photograph people.
Why isn’t the camera meter affected by the aperture of the lens AND the focal length of the lens?
Compared to a hand held light meter which isn’t affected by either
By inference there is no way to have a hand held meter give the same results. Making the hand held superfluous
Thank you
Hand held meters measure ambient light. They are also called incident meters. In camera meters measure reflected light and this is why it’s affected by the lens sometimes.